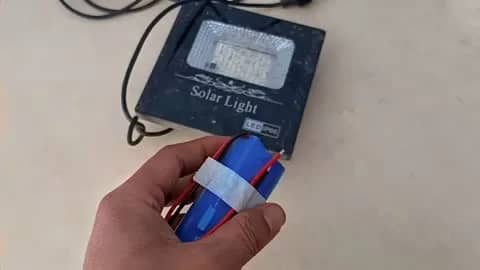
Why do you need replace batteries in solar lights?

1.The importance of regularly replacing batteries
When we talk about the importance of regularly replacing solar batteries for solar lights, it’s not just about lighting up solar lights every night. As confirmed by any homeowner investing in solar energy, solar batteries for solar lights are an important component of garden or outdoor solar lights solutions. They charge during the day and supply your lights at night. However, over time, the efficiency of these batteries decreases. Regular replacement can ensure the optimal performance and lifespan of solar lights. Continuous battery health monitoring brings us closer to a more sustainable world.
2.The impact of battery health on the performance of outdoor solar lamps
Consider solar batteries as the core of solar lighting equipment. Its health condition directly affects the performance of solar energy. We all see that the sunlight is darker than expected, or it doesn’t last all night. These are common symptoms of battery fatigue and wear. If there is a problem with your solar lights, replacing the battery may be exactly the power they need.
3.Common signs that solar batteries need to be replaced
Despite being fully charged, lighting still decreases
For beautiful nights, every homeowner cherishes a bright garden or terrace. If your solar outside light starts to dim or turn off earlier than before, it may indicate the need to replace the battery.
How to replace batteries in solar lights ? Replacing solar batteries for solar lights is a relatively simple process.
Here’s a step – by – step guide:
1. Gather the Necessary Tools
You’ll typically need a screwdriver (usually a Phillips – head screwdriver) to open the solar light casing. Make sure you have the correct replacement batteries on hand. The most common battery types used in solar lights are Ni – Cd (Nickel – Cadmium), Ni – MH (Nickel – Metal Hydride), or rechargeable AA or AAA lithium – ion batteries. Check the user manual of your solar light to determine the exact battery type and size.
2. Locate the Battery Compartment
Most solar lights have a battery compartment that can be accessed from the bottom or the back of the light fixture. Some solar lights may have a small latch or a series of screws that hold the compartment cover in place.
3. Open the Battery Compartment
If there are screws, use the screwdriver to carefully remove them and set them aside in a safe place. If it’s a latch – type cover, simply pry it open gently. Be careful not to damage the light fixture or the compartment cover.
4. Remove the Old Batteries
Once the compartment is open, you’ll see the old batteries. Take note of the battery orientation (the direction in which the positive and negative ends are facing). Gently pull out the old salor lights batteries one by one. Some batteries may be held in place by a small spring or clip, so you may need to use a bit of force to remove them, but be careful not to break anything.attention must be paid to the type and size.
5. Insert the New Batteries
Insert the new batteries into the compartment, making sure to match the polarity (positive and negative ends) correctly. The positive end of the battery usually has a plus (+) sign and the negative end has a minus (-) sign. The battery compartment may also have markings to indicate the correct orientation. Insert the batteries one at a time and make sure they are firmly in place.
6. Close the Battery Compartment
After inserting the new batteries, carefully close the battery compartment. If you removed screws, replace them and tighten them just enough to hold the cover in place without over – tightening and stripping the screw holes. If it’s a latch – type cover, snap it shut.
7. Test the Solar Light
Place the solar light in a sunny location so that the solar panel can charge the new batteries. Wait for a few hours to allow the batteries to charge, and then test the light at night to make sure it’s working properly. If the light doesn’t work, double – check the battery installation and make sure the solar panel is clean and unobstructed. It’s important to note that different solar light models may have slightly different battery replacement procedures, so it’s always a good idea to refer to the manufacturer’s instructions if you’re unsure.
Tips and precautions for replacing solar cells
1.The role of solar cell types and evaluation
One thing I have learned in my 18 years of working in the field of solar energy is that not all batteries are equal. Each type and grade will affect the performance of solar lights. Always replace batteries of the same type and value for optimal performance.
2.Potential issues of mixing different types of batteries
Be careful when mixing different types of batteries. This may lead to a decrease in the performance or potential damage of solar lights.
3.Applicability of non rechargeable batteries
Although this may be tempting, avoid using non rechargeable batteries in solar lights. They are not designed for charging solar panels at all, and using them may damage your lights.
4.Precautions for replacing different battery technologies
For homeowners who plan to switch from nickel cadmium batteries to nickel hydrogen batteries or any other similar changes, please ensure that your solar lights can handle the switch. Not all solar lights are suitable for different battery technologies.
5.Common questions about solar cells
At this point, some common questions about solar cells may arise. To alleviate your concerns, please make sure to review our complete guide on how to repair solar lights.